Sunday, June 28, 2020

Winging It! Our Hens + Chicken Coop

Our idea sprouted within the week of learning that we were able to have five hens. We had planned on having chickens once we would leave the city and we never knew that having chickens was a possibility on our city lot. I came across an article early May and once the news came to our attention we started to draft the chicken coop plan and jot down our ideas. A new idea was due; since Mallory's birth we have done mini projects here and there but nothing exciting. Plus, what makes the idea so exciting is that it was spontaneous. At times I dislike my planning personality, because there's no surprises. Do the laundry, wash the dishes, feed the dog, feed the baby, feed the husband, the list continues. A routine is nice, but at times its awesome to be able to stop and surprise yourself with a little bit of fun. Your fun might not look like ours: gaining 5 chickens with a 5 month old plus a lab that's trained to bird hunt; we enjoy a good challenge and our plate full.

Our design was inspired by an old farm's shed we have access to. This old farm is a goldmine for people like Nate and I and we even started to call it our "salvage spot." We were able to get all of our exterior materials from the salvage spot which included: wood siding, trim, metal tin roof, hinges and locks. The hunt for the old character is what I live for in any project. There is no better high for me than to find a used discounted item and incorporate it into our lives.


Nate framed up the coop and was gracious enough to put the time and effort into an extended cupola that runs the length of the coop; what it takes to win me over. The cupola has windows on both sides for ventilation and light for the chickens. We got all of our coop guidelines by reading blogs and watching tutorials. Each hen needs at least two square feet of space in the coop which resulted in our 4'x4' sized coop. We have three 1'x1' nesting boxes that the chickens lay their eggs in and also added thick branches for the chickens to sleep on. Along with the coop, we made and enclosed 4'x8' run to obtain up to five hens.


Our five hens, Dolly, Nugget, Loretta, Little & Butch, are roughly 4 months old and together lay 3 to 6 eggs each day. Initially, we fed the hens a grain that had 16% protein. This resulted in the hens growing rapidly yet laying membrane eggs. To harden the shells, we added cal to their diet which lead to an increase in laying as well as hardened eggs. The hens enjoy their coop and love to venture around our backyard. With having minimum knowledge, we feel our success is increasing and we are enjoying our small hobby.

Sunday, January 19, 2020

Girl's Nursery feat. Charcoal Blue

Mallory's nursery is complete and will endlessly change as we reach different stages of her life. I already had all the basic decisions made and big ticket items purchased before we knew the gender of our little one. Sherwin Williams Charcoal Blue paint color was my first decision I made. I fell in love with how rich the color was and I loved the idea of playing with different pops of color. The contrast is so intense with a variety of colors that even the smallest items turn into such key statement pieces. Blue is so neutral especially when it's paired with vibrant colors. 

The neutral and basic theme continues. I added a gunmetal colored curtain rod with cream colored curtains and moved this rug from our living room to the nursery. The wood floors needed a white rug to brighten the room and to make the room feel more spacious. The photos do not lie; there is very limited space in this room. It's unique shape and size really was a challenge when trying to find all the items that fit together and flow. Finding a dresser gave me a good run. The dresser could only be so tall to be utilized as a changing table, needed an abundant amount of storage for most of the baby clothes, and had to be short in width so it would not crowd the crib's space. I scavenged the internet and thrift sales until I came across this one that would fit perfectly in our space. After some contact paper, prime and paint the dresser could be checked off the nursery checklist.  

Mallory's room consists of so many antique and thrift items along with some new items to help give it a personalized touch. I cannot pinpoint a specific theme. We definitely defied the nursery norm of Pinterest and gray walls. The mahogany colored wood accents and white accents allow the Charcoal blue paint to have so much purpose. In the beginning, I stated that Mallory's room is complete but now I think I have a great base of items and I could definitely go shopping for more fun accents of my own to add to the mix. Some fun greenery pressed wall art, boho themed accent pillows for the crib, a fun knitted poof up next to the tepee, a plant in a fun raised planter with a stand...
See how my mind wanders just like a home goods store from aisle to aisle. 

Thank you for reading and enjoy the photos of Miss Mallory's room.
XOXO


Monday, October 7, 2019

Making an Entrance with Double Doors


Last winter we had problems with our home being super drafty in our front entrance and living room. Our front entrance is an addition to the original home that was never insulated and leads into our spacious living room. We knew going into this winter that we had to improve the insulation some how. Initially, we wanted to try blow in insulation at our north facing walls and surround the front entry addition. It turns out with our steel siding and the unpredictability of what's hidden in an old home's walls, the price would have been a pretty penny. Back to the drawing board, we decided to hunt down double doors to block off the drafty front entry from our living room.

We purchased the two vertical panel doors from Dell's Architectural Antiques in Eau Claire. The owner took the dimensions of our archway and pulled two matching pairs of double doors that would work in our space. He was even able to supply us with door hardware that matches the old skeleton locks throughout our home and an antique light fixture for our foyer overhead. Leaving Dells, we knew the doors would compliment our homes character. I always find it my goal in our renovations to keep the character the house presents. Even if I personally like a look better, my gut always points me to what will match best and show that it has been there since 1946.

This project took us 3 good weekends to complete. Nate had said in the middle of the renovation that this was our most challenging reno yet. Between getting measurements correct and presenting an appealing aesthetic we both had our work cut out for us. For me, the challenge surfaced a lot of unknown knowledge of all that goes into making a door function- and we were doing two. 

With the double doors installed and all the final touches complete, we are happy to share that the doors eliminated our draft immensely. The double doors add an immense amount of character and function and that my friends is a win of a renovation. The front entry now reminds me of a small 3-Season porch with some bench seating perfect for sunny fall and spring days. We already are loving the doors and cannot wait to continue to use them in our daily living. Personally, I cannot wait to decorate them with fun Christmas wreaths in a month here. 


Before


After


Until next time!
 -Nate and Madalen


Friday, July 12, 2019

Out with the Old (Patio) and in with the New (Landscaping)

Everyone gets busy in these summer months that come and go so quick. We have started the summer off with a bang at the Mack residence. Our aged and cracked concrete patio has been hauled away and landscaped to perfection thanks to the big guy in charge. Our back  patio butts up to the foundation and has given us nothing but problems since we've moved in. Because it was so cracked, water from rain showers would pool up resulting in standing water. Through out this past winter we had even more trouble with the water and snow concoction pooling up and then coming through our foundation to our basement. Nothing better for newlyweds than a flooded basement. We went into the summer more ambitious than ever to correct and fix this problem that the previous homeowners had been neglecting.

To start, Nate and a group of our family members came over to remove all of the cracked concrete.
We installed a window well at the left block window and fabricated a corner piece of metal for the right block window to insure water stays out. Nate rented a trencher to trench deep underground canals to run the drain tile which now connect to 2 french drains. These drains are huge basins to drain any water 6 feet down in the ground.We then put an order in for black dirt to fill in the empty space where the patio laid and fill in the trenches.  Every day for two weeks Nate would be outside trying to finish this project up; talk about a work horse!


We finally have got the landscaping completed featuring grass seed, edging, fabric and mulch. About a month later all the plants and grass have grown in enough to show everyone the finished product. Being built in the 1940's, there are multiple additions that this house has gone through including the kitchen, back breeze way, and master bath. Having such a unique home, makes some projects much more interesting than expected. Keeps us always on our toes and thinking.


Thursday, January 10, 2019

Kitchen Demo

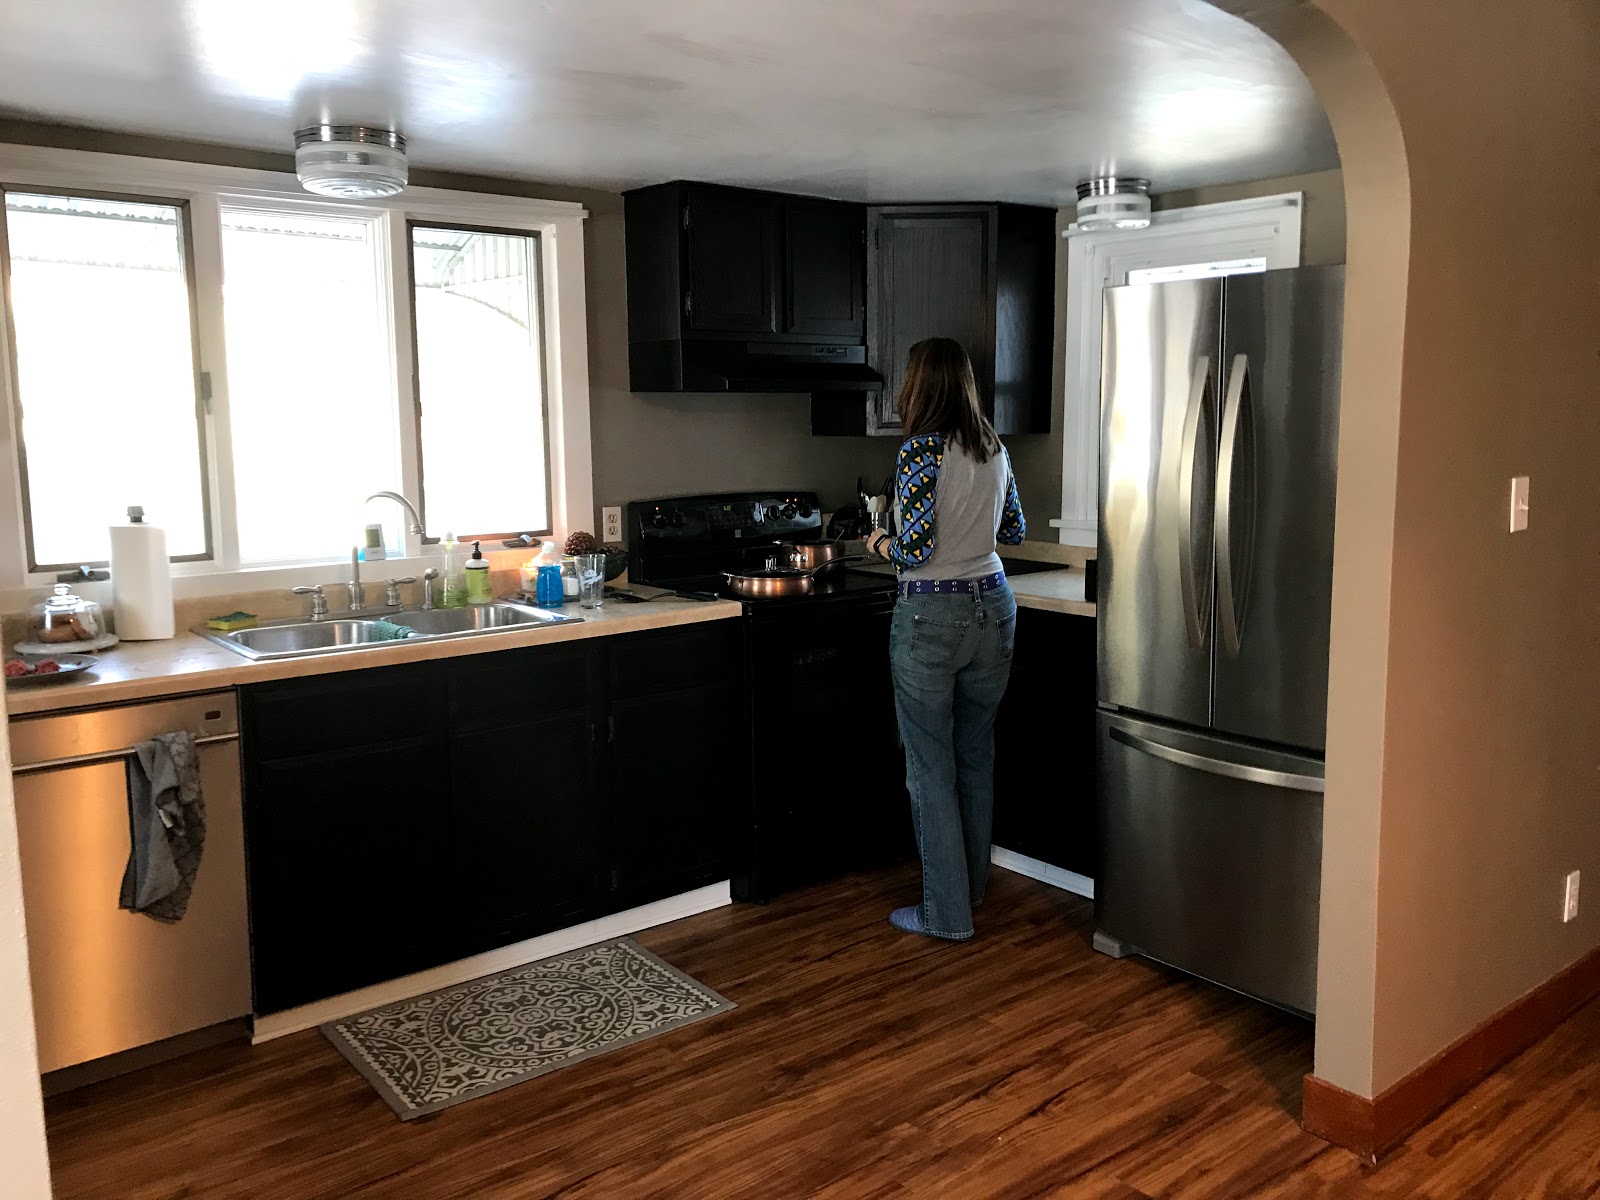
Do you have a space in your house that has bothered you ever since it became your home. This space for me is my kitchen. It's not wide, short in length and doesn't utilize the space to it's potential. The first weekend we moved in I was itching to create the space that worked for me and that would work for future homeowners. The big red exclamation was the cabinet stain. The sellers of our home tried to apply a DIY gel stain to the cabinets and took no steps to creating an ascetically pleasing look. They didn't sand down the cabinets, take off the hinges, tape the cabinets up, or apply a lath/ polyurethane top coat . The result was a disaster which resulted in excess dark stain on the wall, ceiling and counter top, streaky lines on the cabinetry, chips and marks all over, and one motivated buyer- me.

We first took off the cabinet section with the microwave (by we I obviously mean Nate), because that was the eye sore when first walking into the kitchen. I sketched out a plan with floating shelves in placement of the current microwave cabinet and an over the range microwave installed over the stove. It makes sense to replace the hood that was currently over our range with the microwave to give us more shelving space. Plus, the microwave stuck out so far out of all the rest of the cabinetry it drove me nuts. We then continued and took down the hood and cabinet section above. Tearing everything down is the easy and exciting part. Then you get into the "oh shit" situations that spin your head.

Putting back the pieces of a jigsaw puzzle is comparable to what we went through in our next steps. We bumped the right corner cabinet out, installed the top cabinet piece that was above the previous microwave to go atop the new uninstalled microwave, installed the microwave underneath and some how it all fit together. 

I bought a wall texture spray and applied it to the left of the window. I only had to wait 30 minutes to paint over the texture and it made it look like the wall was always like that. We then bought a 9 1/4" wide board, cut two 30" in length shelves, and applied a gel poly to seal the cedar. My dad welded us 4 brackets to support the shelves and I spray painted them black to look concise with the kitchen's look. 

On top of all these tasks, we also stained our cabinets on 3 separate occasions and applied a gel polyurethane. The previous homeowner was nice enough to let us know what stain she used and it took us 3 applications to finally get a clean look with no streaks. At Menards we purchased cabinet hardware to attach to all of our doors and drawers. We were lucky enough to not have had any preexisting hardware.

Our kitchen renovation was our most challenging reno yet. Each step of the way was a struggle and mind boggling. Over a month's period and around $600 dollars later we are at the finish line. Being handy and willing to take on these tasks allows us to make all these changes to our home. I do not even want to imagine the cost of a painter alone to come and re-stain my cabinets. Our kitchen now is functional, modern, spacious, and aesthetically pleasing. It gives off a warm and raw look that portrays a feeling of cleanliness. Being the kitchen, the cleanliness feeling is a must.

Through all my details and blurts of information in the blog, I hope you take a hammer to a space that is asking for it. What better month to it then January. You're stuck inside because of the cold, plus a lull of events occurs after the holidays. Am I convincing? Starting is never easy, because then for a month you'll be living with a space all out of sorts. Starting forces you to get to the next step though and all the steps following gets you to the worth of your effort. 

Good luck and share with me what space you'd like to take a hammer to. 

The End Result


Our Kitchen's Transition


Sunday, December 2, 2018

A Time of Comfort & Purpose

    Purpose is what we all long. Whether we are trying to find purpose through our career, the places we seek, or family connections, we always can rely on the holiday season to centralize ourselves. This holiday season I find that my purpose is to seek out different experiences and traditions while remaining loyal to the traditions I keep near. These new traditions and experiences I speak of have a lot to do with my most valued possession: my home. Home is where we all find comfort during the holidays. I know that I have purpose towards helping others accomplish finding their place of comfort and helping to show others how to make their house a home that they can express themselves fully. Ideas and thoughts come easy to me and I hope someday to put this purpose of mine to good use. With that being said, I would like to share my place of comfort during the most wonderful time of the year.

   Let the greens take over your outdoor space. There's nothing more inviting during the holidays than the look of fresh greens outside a home. In Wisconsin, we especially need to bring some life to our outside, because of the snow making all color disappear. Make your outside inviting for your family to come home to every day. It is worth the effort to create the feeling of comfort and ownership.


   The Christmas tree is the best part of decorating. My theme this year is woodsy with a touch of class. I kept it super simple and chose a lot of grey tones to combine together. Don't be afraid to be bold and add large pieces to your tree instead of using multiple small pieces. I used my galvanized tree collar last year which goes well with the grey tones, but I felt I needed something richer.


   For my finale I wanted to share my new find that I came across at our local second hand store. I plan to have this buffet for years to come, because of how much functionality and organization it brings to my dining room. My dining room is the place where I find the most comfort in my home. I find that comfort through my decoration and pieces that I have accumulated over time just like this buffet. I always look forward to coming home and spending time at the dinner table.


   During this holiday season I hope you all find your comfort at home and feel purpose towards your experiences and traditions with friends and family. When talking with a friend, we determined that our time is what is valued during this time of year. This Christmas try spending time with close friends and relatives out of the times you traditionally get together. Think of experiences that you can do together to make your memories more savored during this fun season and be present with the people that gather.

Thank you for your support and have a joyful holiday season everyone.

Saturday, July 28, 2018

Shades On & Work Gloves Off

In honor of our house warming today, we are pulling off the work gloves (so we say), and unveiling the place we call home to all you lucky and curious people. This past week Nate turned to me and said, "As much as I give you a hard time about starting projects, I do like your style and how everything is turning out." This entire experience of purchasing our first home gives me a large amount of hope for bigger and better things as we age. Life can get extremely busy at times, and it's nice to be reminded of what you want out of it.

We finally have curb appeal! We revamped the face of our home with some fun textured grey steppers running to the front door, sharp looking sconces that gives off a contemporary feel, perfectly placed boulders and an array of plants to bring life to the front.


Look out, our back is about as cute as our front! We came across an old electrical spool that I love having to set food and beverages out on or even as a high top to eat on. I have loved having guests over out on the patio, because it is the perfect place to entertain.


Our living room is so cozy and has that homey vibe; I'm always put in a good mood when enjoying this room. The black clock is my statement piece and is complemented with re-purposed patterned panels on the opposite side of the room. My farmhouse style buffet is my favorite focal point in our home. Simplicity with accumulated antiques and picture frames makes for a great space fill on the shelves!


The next statement piece is going to be behind our dining table. I want to fill the large white frame with rows of ship lap to create a 3 dimensional background. This is the next project I am going to throw at Nate...


I found this small table and metal bins at a flea market this summer. They are the perfect addition to our bathrooms and shapes both rooms to remove the bareness.


Everything is coming together better than I expected and there is much more to come. I like to keep it simple and not over complicate each individual room in our home. Your decoration, furniture, and trinkets should be spread out in the space you have to make the rooms feel inviting. Clutter is a focal point, so keep your items organized and purposely placed to show visitors an attractive setting.


The black and white color combo has really inspired me since we moved into our white sided and black trimmed home. It's easy for me to always come back to the color combo when designing, because it's already the exterior look. I encourage you to do the same! Choose a color pallet of 3 colors at the most and run with it. It's makes it easy to add new pieces of furniture and decor inside and out.

Thank you for all of your continued support and for viewing our blog! The viewing numbers keep rising every post, so please, please, please show and share with your friends and family. I have loved blogging and my journey as a blogger has just begun! We have big end goals in mind and we love working on our house, because it allows us to get our feet wet.
Thank you again!!!

Nate & Madalen